


Do you know that you can create a new Recycle Bin which will work similar to the normal recycle bin? This step by step guide will show you how to create another Recycle Bin
1. Create a new folder in C drive of the computer and name it Recycle Bin2 (or whatever you want to). Make a short icon on the desktop by clicking the right button and selecting –> Send To -> Desktop (Create Shortcut).
2. Now go on the Desktop, choose the folder and rename it to Recycle Bin2 (or whatever you want to). By going to its properties (click the right button and select Properties) change its icon image.

3. Now you would like to hide the actual Recycle Bin2 folder from the C drive and make it only accessible from the Desktop (similar to the default Recycle Bin). To do this, open the Command Prompt (Click Start, then Run, and press enter after typing ‘cmd’). Type the following command in the command prompt:
attrib “C:/Recycle Bin2” +r +s +h
Press Enter
Then type exit
And press Enter

Now the folder is hidden from C drive.
4. Now to move any file into Recycle Bin2 and empty it, we will need to create two batch files. Open a notepad file (or any other text editor) and put the following code:
@echo off
cls
echo moving file(s) to RB3...
move %1 "C:/RB3/"
Save it as RB2bin.bat and move it to the C:\WINDOWS\system32 folder. This file is for moving the selected files into the Recycle Bin2 folder.
Now create another batch file for emptying the Recycle Bin2. Open a notepad file and write the following code in it:
@echo off
cls
echo Emptying RB3..
attrib "C:/RB3" -r -s -h
rd /s /q "C:/RB3"
md "C:/RB3"
attrib "C:/RB3" +r +s +h
Save it as RB2del.bat and move it to C:\WINDOWS\system32.
5. Now to create registry entry for these files, open Registry Editor by going to Start -> Run, type regedit and press Enter.

Now in the left column of registry editor, expand the HKEY_CLASSES_ROOT and find the * on the top most and expand it. Now Right click on * and click new -> key and name it shell.

Now Right click on the shell and create another key with name Empty the Recycle Bin2. Now click on the Empty the Recycle Bin2 and by right clicking create another key in it with the name – command. Now click on the command and select the file shown in right side of the editor with name Default. Right click on it and select modify.
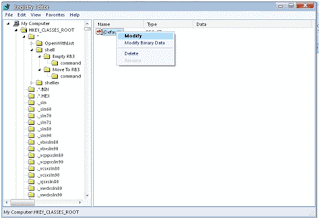
Type the following path in “value data field”:
“C:\WINDOWS\system32\r2del.bat"
And press ok.
Now right click on the Shell and create another key with the name Move to Recycle Bin2. Create another key in it with the name command. Click on the command and select the file in the right side of the editor with the name Default. Modify the file by typing the following value in the “value data field”:
“C:\WINDOWS\system32\r2bin.bat" "%1"
And press Ok.
6. Now also find the subdirectory of HKEY_CLASSES_ROOT named directory in the Registry Editor. (Quite below the *) and expand the directory.
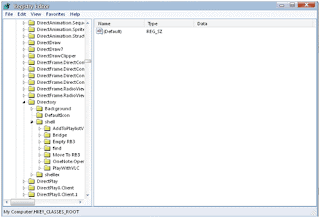
There should be a folder named shell. Repeat the exactly same process done in the above in the * subdirectory by creating two keys named Empty the Recycle Bin2 and Move to Recycle Bin2 and so on..
7. Now the folder Recycle Bin2 will work as the normal recycle bin. You can check it by clicking the right button on a file and selecting “Move to Recycle Bin2” option.


